


Mar 13, 2012
Panasonic GX1 versus Canon G1X
Panasonic GX1 versus Canon G1X:

DCfever (Click here) compared the JPEG quality of the Canon with the one of the Panasonic GX1. Please notice that Panasonic has an average JPEG engine while Canon is known to be much better. A RAW image comparison would probably show a more “real” sensor performance. The JPEG comparison show a slight advantage of the Canon at Low ISO while at High ISO the difference is less pronounced. I think you want see any difference when looking on real printed images.
The Canon G1X is a very strange concept I can’t fell in love with. It will be much more interesting to see if Canon will launch their new interchangeable lens mirrorless system with exactly the same sensor size of the G1X! …P.S.: Don’t even think Canon would join the m43 system, that’s impossible…or not?
Comparison at 1.600 ISO
Canon first attempt to fight against the mirrorless world is represented by the fixed lens Canon G1X camera ($800 at Amazon).The camera uses a Four Thirds ratio sensor that is just a tiny bit bigger than our Panasonic/Olympus Four Thirds sensors. Being used to compare our m43 image quality with the larger APS-C sensor I thought it might be interesting to see how the image quality of the two almost equal sized sensor would be (18.7 x 14mm vs. 17.3 x 13mm)DCfever (Click here) compared the JPEG quality of the Canon with the one of the Panasonic GX1. Please notice that Panasonic has an average JPEG engine while Canon is known to be much better. A RAW image comparison would probably show a more “real” sensor performance. The JPEG comparison show a slight advantage of the Canon at Low ISO while at High ISO the difference is less pronounced. I think you want see any difference when looking on real printed images.
The Canon G1X is a very strange concept I can’t fell in love with. It will be much more interesting to see if Canon will launch their new interchangeable lens mirrorless system with exactly the same sensor size of the G1X! …P.S.: Don’t even think Canon would join the m43 system, that’s impossible…or not?
Mar 7, 2012
Robin Wong: Olympus OM-D E-M5 Review: Batu Caves, KL
Robin Wong: Olympus OM-D E-M5 Review: Batu Caves, KL: Important Notes: 1. This is a user experience based review. 2. All images were shot in RAW and converted directly to JPEG Large SF (super f...
Jan 24, 2012
Steve Jobs Met with Light Field Camera (Lytro) Company's CEO
Steve Jobs Met with Light Field Camera (Lytro) Company's CEO: 
In the upcoming Inside Apple book by Adam Lashinsky, it's revealed that Steve Jobs had expressed interest and subsequently met with the CEO of Lytro, the makers the first light field camera. The relevant book quote posted by 9to5Mac states:
Light field cameras are a different take on photography by capturing "the entire light field" and saving all that information into a single file. Photographers can then edit the file afterwards in a number of unique ways -- including refocusing the image. This video walks through this unique ability:
One of the limitations in the early light field cameras is a relatively low resolution. The first Lytro camera produces final photos of only 1.2 megapixels (1,080x1,080). The cameras also don't take any video and start at $399 for an 8GB model. The camera carries an elongated form factor that seems to be a result of the unusual optics required.
Given the hype surrounding the technology, it's perhaps no surprise that Steve Jobs found interest in meeting with the young company. That meeting, however, is getting special attention due to the fact that Walter Isaacson had said that Jobs wanted to reinvent television, textbooks and photography.
Apple just released their first digital textbooks for the iPad, and is expected to get into the television space. Apple's future goals for photography, however, remain unclear. Apple includes a digital camera its iPhones and has made progressive improvements in camera quality over the past few generations. While Apple no longer makes a standalone digital camera, they were one of the first to product a consumer targeted digital camera back in 1994.
Given the popularity of smartphones and the subsequent decline of point and shoot camera popularity, we'd expect any future Apple movement into photography would be centered around the iPhone.
Recent Mac and iOS Blog Stories
• Virgin America Names Jet After Steve Jobs
• Comic Writer Tries Out iBooks Author
• 'Evi' Arrives as Potential Challenger to Siri
• UpNext Releases Impressive 3D Mapping App for iPad
• Ten One Design Releases Magnus Magnetic Stand for iPad 2


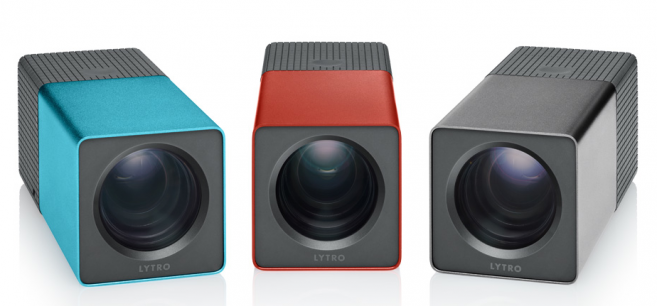
In the upcoming Inside Apple book by Adam Lashinsky, it's revealed that Steve Jobs had expressed interest and subsequently met with the CEO of Lytro, the makers the first light field camera. The relevant book quote posted by 9to5Mac states:
The company’s CEO, Ren Ng, a brilliant computer scientist with a PhD from Stanford, immediately called Jobs, who picked up the phone and quickly said, “if you’re free this afternoon maybe we would could get together.” Ng, who is thirty-two, hurried to Palo Alto, showed Jobs a demo of Lytro’s technology, discussed cameras and product design with him, and, at Jobs’s request, agreed to send him an email outlining three things he’d like Lytro to do with Apple.Lytro received a lot of press last year when the first of its light field cameras went on sale in October. The product even received Popular Science's 2011 Innovation of the Year.
Light field cameras are a different take on photography by capturing "the entire light field" and saving all that information into a single file. Photographers can then edit the file afterwards in a number of unique ways -- including refocusing the image. This video walks through this unique ability:
One of the limitations in the early light field cameras is a relatively low resolution. The first Lytro camera produces final photos of only 1.2 megapixels (1,080x1,080). The cameras also don't take any video and start at $399 for an 8GB model. The camera carries an elongated form factor that seems to be a result of the unusual optics required.
Given the hype surrounding the technology, it's perhaps no surprise that Steve Jobs found interest in meeting with the young company. That meeting, however, is getting special attention due to the fact that Walter Isaacson had said that Jobs wanted to reinvent television, textbooks and photography.
Apple just released their first digital textbooks for the iPad, and is expected to get into the television space. Apple's future goals for photography, however, remain unclear. Apple includes a digital camera its iPhones and has made progressive improvements in camera quality over the past few generations. While Apple no longer makes a standalone digital camera, they were one of the first to product a consumer targeted digital camera back in 1994.
Given the popularity of smartphones and the subsequent decline of point and shoot camera popularity, we'd expect any future Apple movement into photography would be centered around the iPhone.
Recent Mac and iOS Blog Stories
• Virgin America Names Jet After Steve Jobs
• Comic Writer Tries Out iBooks Author
• 'Evi' Arrives as Potential Challenger to Siri
• UpNext Releases Impressive 3D Mapping App for iPad
• Ten One Design Releases Magnus Magnetic Stand for iPad 2
Dec 6, 2011
A Skin Smoothing Preset For Weddings and Portraits
A Skin Smoothing Preset For Weddings and Portraits:
One of my favorite features in Aperture 3 is the Skin Smoothing tool (available under Presets in the Adjustment Pane.) With a single tool it’s a snap to take out minor wrinkles and blemishes with a quick flick of the wrist. And I’m going to share that with you via a preset.
I have a bit of a technique for using the tool which doesn’t involve the brush and I use it often with wedding shots where I don’t want to make the bride look glossy or over-produced but I want to help reduce the shadows in facial features that can come from different light sources. No one wants to go through an hour of makeup to have an overhead tungsten light make them look old, but I also don’t want to have them look like they’ve been Photoshopped either.
The trick is this—since the skin softening tool works primarily on skin (hence the name) and tends to leave non-skin-toned sections alone, I apply it to the whole image. This is possible with any of the brushable adjustments from the floating palette with their sliders.

This smooths out the whole look, but it also modifies the exposure and the contrast a bit. That’s easily fixed with a bit of adjustment to the Exposure slider and the Black Point slider.
Usually after a shoot I’ll judge the relative exposure levels of the shots (outside, in the hall, during the ceremony) and make a series of presets for each condition.
This sometimes works well enough that it’s the only edit I do to a photo, and even when the image needs more work it’s enough for me to show it to the client to see if it’s a photo they’d like to use and then I can go back and tweak it some more.
But, and here’s the nice thing—you don’t have to do any of this work.
Download this preset (unzip it by double clicking on it) and import it to your adjustment presets using these steps.
1. Bring up the Adjustment panel by pressing Control-A.
2. From the Presets drop down, select Edit Preset

3. Click the Action menu (it’s shaped like a gear) on the lower left of Adjustment Presets window.

4. Select Import…
and point the dialog box at the file you’ve just downloaded.
Now when you go to your Presets menu you’ll see the new preset and can apply it to your images. This particular one has a bit more than a stop of exposure adjustment (because it was made for a specific lighting environment I had) but you can tweak it as you want and then just save a new version.
As a final note, often when I’m using this (especially in sunlit shots) the detail on the dress can blow out along with the exposure adjustment, so I’ll often make a version of this preset with some Recovery added.
Nov 29, 2011
21 Inspirational Natural Light ‘Window’ Portraits
21 Inspirational Natural Light ‘Window’ Portraits: 


Image by Daniel Zedda
One of the most effective pieces of lighting gear ever invented is available to almost every photographer in the world… unless you’re living in a cave (and even then you might have one).
Image by Anna Gay
It’s the window.
Image by Eric Meuller
I hear many photographers asking about what lighting gear to purchase to light their portraits – but I’m a firm believer that the natural light provided by a window can often do the job as well – if not better – than any expensive gear that you might buy.
Image by Meredith Farmer
Here’s a collection of images that were all taken predominantly with natural light – in most cases at or near a window. Enjoy.
Image by Shandi-Lee
Image by Paul Goyette
Image by John Meuller
Image by Mr Story
Image by Beni Ishaque Luthor
Image by Gabriela Camerotti
Image by The Q
Image by Sebastiano Pitruzzello
Image by Gabriela Camerotti
Image by Jay Ryness
Image by Raymond Larose
Image by gabriele fanelli
Image by Sebastiano Pitruzzello
Image by Jay Ryness
Image by Drew Herron
Image by brice hardelin
Image by Lauren Nelson
Post originally from: Digital Photography Tips.
Check out our more Photography Tips at Photography Tips for Beginners, Portrait Photography Tips and Wedding Photography Tips.
21 Inspirational Natural Light ‘Window’ Portraits
Nov 23, 2011
The Olloclip 3-in-1 iPhone camera attachment: a cool iPhoneography accessory
The Olloclip 3-in-1 iPhone camera attachment: a cool iPhoneography accessory:


Earlier my colleague Steve wrote about the US$249 Photojojo iPhone Lens Dial, an iPhone accessory that gives iPhone photographers access to an array of three camera lenses on rotating dial. For those of you who like the ability to add lenses to your iPhone, but don't like the $249 price, I recommend the Olloclip, a $69 slip on 3-in-1 lens for the iPhone 4 and iPhone 4S.
The Olloclip started off as a Kickstarter project and went on sale in May. The body of the Olloclip is made of anodized aircraft grade aluminum and it comes in two colors, red or black. On the front end of the Olloclip is the fish eye lens, which gives you a 180-degree field of view. The rear of the Olloclip houses the wide angle lens, which gives you a greater field of view than what your iPhone 4/4S camera would normally have. You can unscrew the wide angle lens to access the macro lens that gives you about ten times the magnification of the subject of your shot within 12-15mm.
To use the Olloclip, simply slip it onto the end of your iPhone, over the iPhone's camera. The notch in the Olloclip is made of plastic so you don't need to worry about it scratching the glass front or back of your iPhone 4 and 4S. The Olloclip's entire 3-in-1 lens solution is quite small, which is nice when traveling. It easily fits into your pants or shirt pocket. The Olloclip also comes with a small, draw-string bag/case made of microfiber material that also doubles as a lens cleaner.
The Olloclip's primary difference from the pricier Photojojo iPhone Lens Dial is that it comes with a macro lens instead of a telephoto lens. However, if macro shots are more important to you than telephoto shots, the Olloclip is a terrific choice for photographers who want to get more out of their iPhone4/4S camera. The quality of its construction, size, and features can't be beat for the price. You can order the Olloclip from Amazon or directly from the company's website.
The Olloclip 3-in-1 iPhone camera attachment: a cool iPhoneography accessory originally appeared on TUAW - The Unofficial Apple Weblog on Tue, 22 Nov 2011 19:30:00 EST. Please see our terms for use of feeds.
Source | Permalink | Email this | Comments
Subscribe to:
Posts (Atom)