Pages

Sep 22, 2010

News – Worth-a-click

News – Worth-a-click: "

Here’s a few news items for the day:


• There’s been lot’s of talk about printing and calibration lately. Well, X-Rite is hosting a free webinar on Sept. 28 called Beyond Monitor Calibration – Get Prints That Match Your Display! Definitely looks like it’s worth checking out.


• Check out PADDY for Lightroom 3. Don’t let the name throw you off. It’s a Windows only :( plug-in for Lightroom that let’s you assign any adjustment setting – including moving the sliders and applying a preset – to keys, your number keypad or external keypads. Looks cool!


• A good buddy of mine, Howard Ignatius, is speaking at an event called Morro Photo Expo along with others like George Lepp. If you’re in the area here’s the link to find out more.


"

Sep 14, 2010

DSLR Video Editing for Photographers

DSLR Video Editing for Photographers: "

DSLR Video Editing in Premiere Pro CS5


In this ongoing video series, Adobe Evangelist Jason Levine walks photographers through the basics of DSLR video editing in Adobe Premiere Pro CS5.


Check out the first 3 videos below.


Download:
FLVMP43GP


Download:
FLVMP43GP


Download:
FLVMP43GP


He’s got more videos planned. So if you like this stuff, you can subscribe to the Adobe Evangelist TV channel on YouTube.

Copyright/DMCA Notice: The RSS entry was originally published on Photography Bay and is protected by copyright laws. It is unlawful to (a) edit, modify, alter, or create derivative works of the text, content or links supplied by Photography Bay, (b) use any robot, spider, scraper, other device or manual process to monitor or copy any content from the Photography Bay RSS feed, (c) sell, retransmit or commercially exploit the Photography Bay RSS feed, headlines or content in any manner except as expressly permitted in writing by authorized representatives of Photography Bay, (d) incorporate advertising into or the placement of advertising associated with or targeted towards the Photography Bay RSS feed or (e) use the Photography Bay RSS feed for any unlawful purpose or in violation of the rights of others. RSSID#794326

"

Sep 10, 2010

HDR Video Using Two Canon 5D MKIIs

HDR Video Using Two Canon 5D MKIIs: "


Read More


Source: Engadget via ImagingInsider.com


"

Spy shot revealed: the new Think Tank Photo’s New Sling-O-Matic

Spy shot revealed: the new Think Tank Photo’s New Sling-O-Matic: "

new think tank bag 225x300 Spy shot revealed: the new Think Tank Photo’s New Sling O Matic Sling O Matic exterior Web 297x300 Spy shot revealed: the new Think Tank Photo’s New Sling O Matic


ThinkTank released a new sling bag “Sling-O-Matic”, the same bag was spotted in the wild few days ago:


Download:
FLVMP43GP


Full press release after the break:


Think Tank Photo’s New Sling-O-Matic™ Series

The First Sling Bags with Easily Reversible Shoulder Straps


SANTA ROSA, CALIF – Think Tank Photo today announced that in October it will release the Sling-O-Matic, the photo industry’s first sling bag that can be easily switched back and forth to either shoulder. The Sling-O-Matic’s adjustable, fully padded shoulder strap “automatically” slides along a set of rails to change which shoulder the bag can be worn on.

This innovation is the solution to the problem inherent with sling bags: they are designed to be to worn over one shoulder only. With one smooth motion, the Sling-O-Matic can be quickly switched to the opposite shoulder without losing the characteristics that have made sling bags popular among photographers.

The Sling-O-Matic series offers three unique bags to choose from, depending on the photo gear a photographer needs to carry. The Sling-O-Matic 10 can carry a pro-size DSLR and three to four lenses, including a 70-200 f2.8. The Sling-O-Matic 20 and Sling-O-Matic 30 can each carry a pro-size DSLR and four to six lenses, including a 70-200 f2.8. The Sling-O-Matic 30 also features a separate laptop compartment for carrying a 15.4” laptop.


Key Features:

• Industry’s first sling bag that can be easily switched back and forth to either shoulder.

• Each bag fits a DSLR with up to a 70-200 f2.8 lens with lens hood in position.

• All bags are flexible to fit most pro size DSLRs with a lens attached.

• Discreetly stylized to avoid obviously appearing like a camera bag.

• Long side pocket for carrying a tripod, large water bottle, or other accessories.

• Large handles on three sides.

• Wide zippered pockets on front, back, and side.

• Business card pocket for identification.

• Removable/adjustable straps and waist belt for additional stability.

• Small storage pocket for storing removable straps.

• Fully padded compartments for protection.

• Seam-sealed rain cover included.


“However flawed their basic design, sling bags have long been a favorite among photographers, especially those who like carrying their gear on their shoulders,” said Doug Murdoch, Think Tank Photo president and lead designer. “With the Sling-O-Matic we solved one of their biggest problems, which is that carrying heavy equipment solely on one shoulder can cause pain. Within just a few seconds, photographers can quickly switch the load – and the weight – from one shoulder to the other.”


SPECIFICATIONS:

Sling-O-Matic 10

SKU: 87453000 430 8 • Part Number: 430

• ID: 8.25” W x 15.5”H x 6”D* (21 x 39 x 16.5 cm*)

• OD: 9” W x 16.5” H x 6” D (23 x 42 x 15 cm)

• MIN WEIGHT: 2.3 lbs (1.0 kg)

• MAX WEIGHT: 3.1 lbs (1.4 kg)


Sling-O-Matic 20

SKU: 87453000 434 6 • Part Number: 434

• ID: 10.25” W x 15.5” H x 6.5” D* (27.5 x 39 x 16.5 cm*)

• OD: 11” W x 16.5” H x 6” D (28 x 42 x 15 cm)

• MINIMUM WEIGHT: 2.5 lbs (1.1 kg)

• MAXIMUM WEIGHT: 3.4 lbs (1.5 kg)


Sling-O-Matic 30

SKU: 87453000 438 4 • Part Number: 438

• ID of photo gear compartment: 11.25” W x 16” H x 6.5” D (28.5 x 41 x 16.5 cm”)

• ID of laptop compartment: 11.25” W x 16” H x 1.5” D* (28.5 x 41 x 3.5 cm*)

• OD: 12” W x 17.25” H x 7.5” D (30.5 x 44 x 19 cm)

• MINIMUM WEIGHT: 2.9 lbs (1.3 kg)

• MAXIMUM WEIGHT: 4.0 lbs (1.8 kg)


Posted by PhotoRumors.com

This RSS feed is copyrighted and cannot be republished in any way without permission.


Rent Cameras, Lenses, Tripods and Accessories by mail Spy shot revealed: the new Think Tank Photo’s New Sling O Matic


Related posts:

  1. Think Tank Photo Airport Takeoff backpack preview

  2. Think Tank Photo giveaway

  3. Think Tank Photo Hydrophobia 70-200 water resistant cover details (exclusive)


"

Photog Distinguishes Himself by Mimicking Google

Photog Distinguishes Himself by Mimicking Google: "San Francisco photographer Michael Jang has adopted an unusual way of gaining attention with his photography website. His new site mimics a Google search page.

"

Sep 1, 2010

How to Make a Tilt-Shift Lens for $10 (Plus Everything You Ever Wanted to Know About Tilt-Shift!)

How to Make a Tilt-Shift Lens for $10 (Plus Everything You Ever Wanted to Know About Tilt-Shift!): "


And now for a non-dictionary of photo terms:


Tilt-shift: not the crazy-legged move we bust on the dance floor.


Selective focus: not the clever strategy used against parents.


Maybe we’re better off referencing our pal Bhautik’s incredible guide to tilt-shift and DIY lenses! It’ll teach you all sorts about tilt-shift, like -


What the heck is a tilt-shift lens anyway? (A lens that can tilt and shift its planes to focus selectively and make the subjects in your photos look miniature, too!)


Isn’t tilt-shift only for 19th Century men with pointy mustaches, cloaks, and large, fancy cameras? (No! Anyone with an SLR can do it!)


Can’t I just fuzzy out parts of my photos using Photoshop? (Yes, but the real thing is so much more fun. PLUS, you can make videos, like this miniaturized San Francisco vid!)


Where do I get one? (Make your own, it’s easy! 3 tutorials teach you how to make your own plunger- and bendy-cams for about $10!)


Now, select your focus and tilt n’ shift til the cows (photos) come home!


Selective Focus: An Illustrated Guide to DIY Tilt-Shift

[Bhautik's Selective Focus Gallery]


p.s. Bhautik is a Research Engineer at Industrial Light & Magic (Lucasfilm!!) and the guy who wrote those amazingly popular plunger-cam tutorials!


p.p.s. The Selective-Focus guide is also available in print via Magcloud.


Photo credits: Bhautik Joshi


Related posts:

  1. Plungercam! 2 DIY Tilt-Shift Lenses You Can Make With Plumbing Hardware

  2. Freelensing! Turn any Lens into a Tilt-Shift or Macro

  3. Make a DIY Fisheye Lens from a Peephole and Soda Can


© lisbeth for Photojojo, 2010. |
Permalink |
No comment |
Add to
del.icio.us


Post tags:

"

Exposure Triangle – Not just about more/less light

Exposure Triangle – Not just about more/less light: "

So we probably all know about the exposure triangle by now. Pretty basic stuff you learn when you’re first getting into manual. And if you’re just learning, you may be wondering what the point is in obsessing over your ISO, aperture and shutter speed. So indulge me as I explain the triangle sub-headings:


{Aperture – Depth of Field} When I learned that there were lenses that were ‘faster’ than others (meaning the aperture can open widely), and that this was required for good photos in low-light situations, I thought ‘great! problem solved!’ Well…problem NOT solved. Why? Because opening your 50mm f/1.4 right up to 1.4 now causes issues with very shallow DOF (depth of field). So if you’re shooting a wedding, perhaps, and your plan is to just open your aperture up, you better have a plan B. Because at some point, the groom will be a smidge in front of the bride or the bride will be holding her boquet in front of her and the focus will fall on the wrong thing. So simply opening your aperture isn’t going to be enough to leave you other settings as they are. Point? When adjusting aperture, don’t just think ‘more light’, also think ‘depth of field’.


{Shutter Speed – Sharpness} When first learning about the exposure triangle, every setting was explained to me in terms of how it dealt with light: aperture lets in more or less light, shutter speed lets it in longer or shorter, and ISO is how sensitive the sensor is to light. But like in the example above, there are other factors when considering your settings. With shutter speed, it isn’t only the length of time the shutter is open that you have to think about. Particularly in low-light situations, using a too-slow shutter can cause camera shake from your shaky hands or motion blur from moving subjects. And this all leads to blurry photos, soft edges and no sharpness in sight. Inside, use as fast a shutter as possible while still being slow enough to fit into your triangle. And if you can, invest in lenses with IS (image stabilising) because this helps you to create sharper photos when shooting at slower shutter speeds or long focal lengths (far zoom) when your hands may be shaking. The short of it? Shutter speed = sharpness.


{ISO – Grain} ISO can be your best friend or your worst enemy. It’s the setting I compromise on last and not if I can help it. I really hate noise. I’m learning not to pixel peep and LR3 is so much better at handling noise than LR2 ever was. That said, just know that ISO isn’t a magic triangle-balancing number. You can’t just whack it up to 3000 and forget about the rest. You should know that higher ISO equals increasingly more noise/grain. And some photographers add grain on purpose, particularly when shooting or editing in B&W. Basically? High ISO = grain


Hopefully, expounding upon these other factors to think about when choosing your manual settings will help you make more informed choices and better photographs.


Post from: Digital Photography School - Photography Tips.


dpsbook.png


Exposure Triangle – Not just about more/less light


"

What Every Photographer Needs to Know about Social Media

What Every Photographer Needs to Know about Social Media: "

An introduction to social media for photographers by Australian Freelance Photographer Gemma Carr (@GemTweetAlot).


How critical is social media/marketing to your photography business?


Photographers are busy people. So too are our clients. More so than ever before we have an abundance of information available to us at the click of a mouse. It’s always evolving; full of opportunity and at times, a little overwhelming.


social media photographers


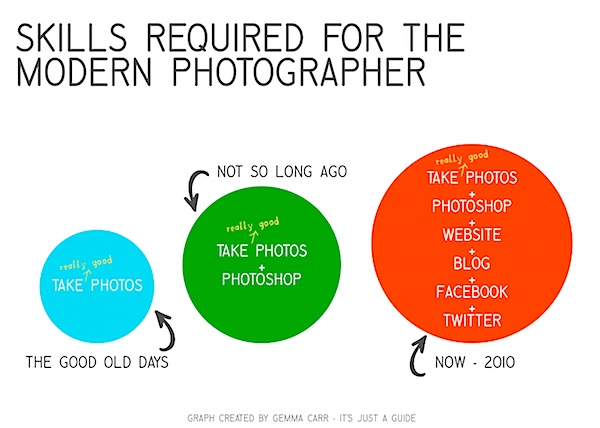
As you can see, the modern day photographer is a busy one indeed. Running a successful photography business has always been about much more than just taking great photos.


As shown in the diagram above, the skills we need as a photographer in 2010 are much more diverse. The list could go on, but, I think you will see the most notable change in skills is the web?based tools such as website/Blogs/Facebook/Twitter.


And with all the new ways to promote your business the range of options is both exciting and challenging. Wouldn’t you agree?


Which social media/marketing tools are right for you?


This is a very personal decision; it’s about finding the right fit for you, your brand and your clients. Often a combination of your preferred tools works really well.


About one year ago, I euthanised my Facebook account. A bold act at the time when I was so heavily entrenched in it, but certainly a move I have not regretted.


About one year ago I set up my twitter account. This, I can report has been the most inspirational move I have made in years.


Instead of being in touch with old high school friends (lovely as they are, we lost touch for a reason) I was now immersed in a world that spread outwards to photographers from all over the world. From my home office in Melbourne I am getting creative inspiration, ideas, technical advice and feedback from my photography and industry colleagues that I never once had.


From using Twitter and linking in to dozens of photographers Blogs, I have realized the potential power of the Blog. If utilized right, a Blog is a current, living document of your photography business. In some cases the Blog can supersede a website.


Why Blog?


Simply so that my current and future clients can get to know me… FAST! My Blog is a behind the scenes look into what I do, it’s more personable and friendly than a website. This is key for my wedding & portrait business clients.


For my commercial clients my website is a more formal introduction to me and my photography. In the short time I have had my Blog online, my enquiries have increased significantly.


Acclaimed Perth wedding photographer, Samm Blake, is testament to how well web based marketing can work:


“My entire business was built on my website, Blog, facebook and twitter!”


“My Blog is definitely the most important marketing tool for my business. It allows me to share my most current work and allows me to connect with current, prospective and past clients as well as many other photographers around the world”


Website Vs Blog


In your business, one web tool may outshine the other. Yet, what is so powerful about these available tools is how amazingly well they can compliment each other. I use my website and Blog to differentiate the services I offer. For me is all about


making it easy for people to find and to connect with me.


“Website and Blog are the most important in our business. The websites works as a medium for art directors, designers etc to look you up and see your work so it’s an important overview of your work. The Blog keeps them informed about what your doing and hopefully on their minds when a suitable job comes up. Obviously you need to promote in other ways which direct people to your website otherwise it can sit there being very idle.”


Adair Lander from Adrian Lander, Commercial Photographer, Sydney.


Shouldn’t I just be taking photos?


Whilst all this stuff sounds easy and exciting, most of it equates to a lot of time and personal input from you. All of the time spent at the computer, is time away from your camera. So, if you consider it a chore to participate in social media, then I suggest you don’t.


The inspiration I have gained from being able to connect with fellow creative people has truly taken me by surprise, yet it all falls into step behind me actually shooting.


Top tips for Blogging


  • Content is king – add regular posts that create interest for your viewers

  • Use Twitter & Facebook to attract visitors to your Blog

  • Match your Blog to your branding


Top Social Media Tips


  • Be yourself, share share share! (but not the nitty gritty details)

  • Respond to others; let people know you are alive and kicking (and interested in what’s happening)

  • Don’t try to do too much, just pick the programs that you enjoy using


At the end of the day, regardless of what decade we are in, nothing is has been or will ever be more important than taking really good photographs.


I am excited about my photography career, I hope you are too!


Gemma Carr is a Freelance Photographer from Melbourne. See more from her at her site GemmaCarr.com.au. Follow her on Twitter at @GemTweetAlot. This post was previously published in the members area of ACMP.


Helpful Links:


  • ProPhotoBlogs – add on software especially made for photographers

  • WordPress.com – free software to build your Blog

  • ProBlogger Blog Tips – a usefull resource with everything you need to know about blogging from starting up to maximizing your BLOG’s potential (also a sister site to dPS).


Post from: Digital Photography School - Photography Tips.


dpsbook.png


What Every Photographer Needs to Know about Social Media


"